본 글은 📚 스프링 입문을 위한 자바 객체지향의 원리와 이해 를 읽고 정리한 내용입니다.
이전글 : [Spring] IoC/DI 제어의 역전/의존성 주입 (1)
[Spring] IoC/DI 제어의 역전/의존성 주입 (1)
본 글은 📚 스프링 입문을 위한 자바 객체지향의 원리와 이해 를 읽고 정리한 내용입니다. 스프링을 이해하는 데에 POJO(Plain Old Java Object)를 기반으로 스프링 삼각형이라는 애칭을 가진 IoC/DI , A
yeoonjae.tistory.com
이전 글에선 스프링 없이 의존성을 주입하는 방법을 살펴보았다. 이번 글에서는 스프링을 통한 의존성 주입을 살펴보자.
스프링을 통한 의존성 주입 - XML 파일 사용
| 의사코드 | 자바로 표현 |
| ApplicationContext context = new ClassPathXmlApplicationContext("expert002.xml", Driver.class); | |
| 운전자가 종합 쇼핑몰에서 타이어를 구매한다. | Tire tire = (TIre)context.getBean("tire"); |
| 운전자가 종합 쇼핑몰에서 자동차를 구매하낟. | Car car = (Car)context.getBean("car"); |
| 운전자가 자동차에 타이어를 장착한다. | car.setTire(tire); |
스프링으 통한 의존성 주입은 생성자를 통한 의존성 주입과 속성을 통한 의존성 주입을 모두 지원하는데, 여기서는 속성을 통한 의존성 주입만 살펴보겠다.
위의 의사코드에서 생산에서 구매로만 변경되었고 나머지는 변경되지 않았다. 스프링을 도입한다고 해서 이전 글의 기존 방식과 달라질 것은 없다. 오직 Driver클래스만 살짝 변경되고, 스프링 설정 파일 하나만 추가해주면 작업이 끝난다.

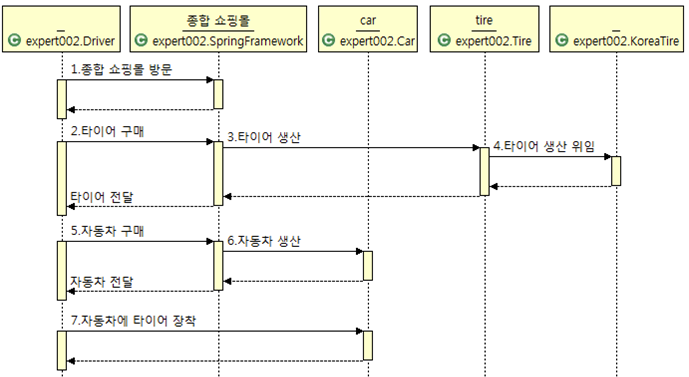
기존 클래스 다이어그램과 비교해봤을 땐 변경된 점이 없고, 시퀀스 다이어그램은 종합 쇼핑몰이 추가된 것을 볼 수 있다. 안파는 것이 없는 종합쇼핑몰 ! 여기서 종합 쇼핑몰의 역할을 하는 것은 스프링 프레임워크다.
종합 쇼핑몰 스프링 프레임워크가 들어오면서 달라지는 코드를 살펴보자.
- Tire.java - 변경된 부분 없음
- KoreaTire.java - 변경된 부분 없음
- AmericaTire.java - 변경된 부분 없음
- Car.java - 변경된 부분 없음
- Driver.java - 변경됨. 기존 생산 과정이 구매 과정으로 변경. 상품을 구매할 종합 쇼핑몰에 대한 정보가 필요하기 때문
이제 코드를 살펴보자.
// 변경된 Driver 클래스
import org.springframework.context.ApplicationContext;
import org.springframework.context.support.ClassPathXmlApplicationContext;

public class Driver {
	public static void main(String[] args) {

		ApplicationContext context = new ClassPathXmlApplicationContext("expert002/expert002.xml");

		Car car = context.getBean("car",Car.class);

		Tire tire = context.getBean("tire",Tire.class);

		car.setTire(tire);

		System.out.println(car.getTireBrand());
	}
}
다음은 XML파일 코드이다.
<?xml version="1.0" encoding="UTF-8"?>
<beans xmlns="http://www.springframework.org/schema/beans"
	xmlns:xsi="http://www.w3.org/2001/XMLSchema-instance"
	xsi:schemaLocation="http://www.springframework.org/schema/beans http://www.springframework.org/schema/beans/spring-beans.xsd">


	<bean id = "tire" class="expert002.KoreaTire"></bean>
	<bean id = "americaTire" class="expert002.AmericaTire"></bean>
	<bean id = "car" class="expert002.Car"></bean>
</beans>
XML 파일은 만들고자하는 패키지에 new-Other-Spring-Spring Bean Configuration File을 선택해서 만든 후 위와 같이 <bean>태그를 이용해 상품을 등록하면 된다. 이 때 각 상품을 구분하기 위한 id속성과 그 상품을 어떤 클래스를 통해 생산(인스턴스 화) 해야 할지 나타내는 class 속성을 함께 지정하면 된다.
xml파일과 각 클래스 파일들의 관계를 선을 통해 나타내면 다음과 같다.
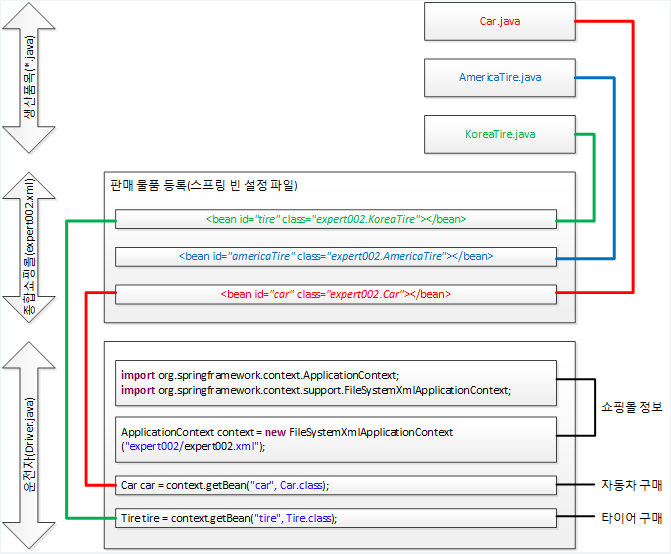
KoreaTire.java가 XML파일에서 id=tire인 bean태그와 연결돼 있고, 다시 Driver.java의 main() 메서드 안의 코드인 context.getBean("tire",Tire.class)와 연결되어 있는 것을 볼 수 있다. 이 과정을 현실 세계의 예로 풀어보면 다음과 같다.
"KoreaTire라고 하는 상품이 tire라는 이름으로 진열돼 있고, 구매(getBean)할 수 있다."
그렇다면 스프링을 도입해서 얻는 이득은 무엇일까? 가장 큰 이득은 타이어 브랜드를 변경할 때 그 무엇도 재컴파일/재배포하지 않아도 XML파일만 수정하면 프로그램의 실행 결과를 바꿀 수 있다는 점이다.
Driver.java의 Tire tire = context.getBean("tire",Tire.class); 부분이 타이어를 구매하는 부분이다. 자바 코드 어디에서도 KoreaTire 또는 AmericaTire 클래스를 지칭하는 부분이 없다. 이를 지칭하는 부분은 expert002.xml 파일에 존재한다. 현재는 XML 파일에 id="tire"인 부분이 KoreaTire로 지정되어 있다. 만약 AmericaTire로 변경하고 싶다면 클래스 이름만 변경해주면 된다.
자바 코드를 변경/재컴파일/재배포할 필요가 없다.
스프링을 통한 의존성 주입 - 스프링 속성 파일(XML)에서 속성 주입
의사코드 - 점점 더 현실 세계를 닮아가고 있다.
- 운전자가 종합 쇼핑몰에서 자동차를 구매 요청한다.
- 종합 쇼핑몰은 자동차를 생산한다.
- 종합 쇼핑몰은 타이어를 생산한다.
- 종합 쇼핑몰은 자동차에 타이어를 장착한다.
- 종합 쇼핑몰은 운전자에게 자동차를 전달한다.
자바로 표현
ApplicationContext context = new ClassPathXmlApplicationContext("expert003/expert003.xml");
Car car = context.getBean("car",Car.class);
XML로 표현
<bean id = "koreaCar" class="expert003.KoreaTire"></bean>
<bean id = "americaTire" class="expert003.AmericaTire"></bean>
<bean id = "car" class="expert003.Car">
	<property = name="tire" ref = "koreaTire"></property>
</bean>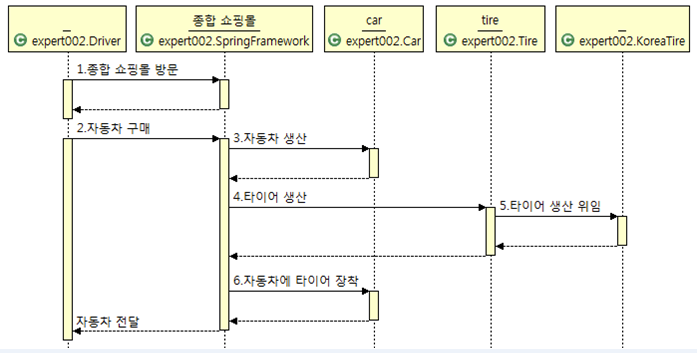
XML파일에 새롭게 property라고 하는 부분은 속성을 의미한다. 변경되는 Driver 클래스와 XML파일의 코드를 살펴보자.
(나머지 파일은 변경되지 않는다.)
import org.springframework.context.ApplicationContext;
import org.springframework.context.support.ClassPathXmlApplicationContext;

public class Driver {
	public static void main(String[] args) {

		ApplicationContext context = new ClassPathXmlApplicationContext("expert002/expert003.xml");

		Car car = context.getBean("car",Car.class);

		System.out.println(car.getTireBrand());
	}
}
<?xml version="1.0" encoding="UTF-8"?>
<beans xmlns="http://www.springframework.org/schema/beans"
xmlns:xsi="http://www.w3.org/2001/XMLSchema-instance"
xsi:schemaLocation="http://www.springframework.org/schema/beans http://www.springframework.org/schema/beans/spring-beans.xsd">
<bean id = "koreaTire" class="expert003.KoreaTire"></bean>
<bean id = "americaTire" class="expert003.AmericaTire"></bean>
<bean id = "car" class="expert003.Car">
<property name="tire" ref="koreaTire"></property> <!-- 속성 설정 -->
</bean>
</beans>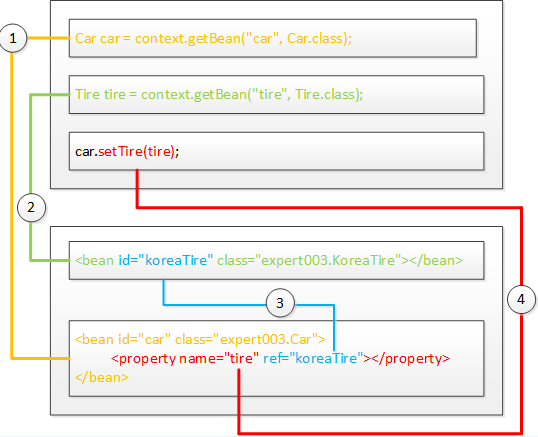
위의 그림에서 1번은 자동차를 구매하는 부분으로 자바 코드 파일에 그대로 남겨둬야 한다. 2번은 타이어를 구매하는 부분으로이다. 3번은 타이어를 자동차의 타이어 속성에 결합하는 부분이다. 타이어의 속성을 XML파일에서 설정해줌으로 인해 Driver클래스에선 tire를 따로 지정해주지 않아도 되며, XML파일의 car를 지정하는 bean의 속성을 변경해줌에 따라 타이어를 바꿀 수 있다.
이는 xml파일만 변경해주면 되기 때문에 유지보수하기 편한 방식으로 변했음을 알 수 있다.
스프링을 통한 의존성 주입 - @Autowired를 통한 속성 주입
의사코드
- 운전자가 종합 쇼핑몰에서 자동차를 구매 요청한다.
- 종합 쇼핑몰은 자동차를 생산한다.
- 종합 쇼핑몰은 타이어를 생산한다.
- 종합 쇼핑몰은 자동차에 타이어를 장착한다.
- 종합 쇼핑몰은 운전자에게 자동차를 전달한다.
의사코드는 위와 동일하다. Car라고 하는 클래스에 tire라고 하는 속성을 만들고 설정자 메서드를 만든다고 해보자. 그럼 대부분은 다음과 같이 코드를 작성할 것이다.
public class Car{
	Tire tire;

    public void setTire(Tire tire){
    	this.tire = tire;
    }
}
반드시 설정자 메서드를 통해 tire값을 주입해야 할까? 스프링의 속성 주입 방법 가운데 @Autowired를 이용하는 방법을 살펴보자.
import org.springframework.beans.factory.annotation.Autowired;

public class Car{

	@Autowired
	Tire tire;
}
import문 하나와 @Autowired 어노테이션을 이용하면 설정자 메서드를 이용하지 않고도 스프링 프레임워크가 설정 파일을 통해 설정자 메서드 대신 속성을 주입해준다.
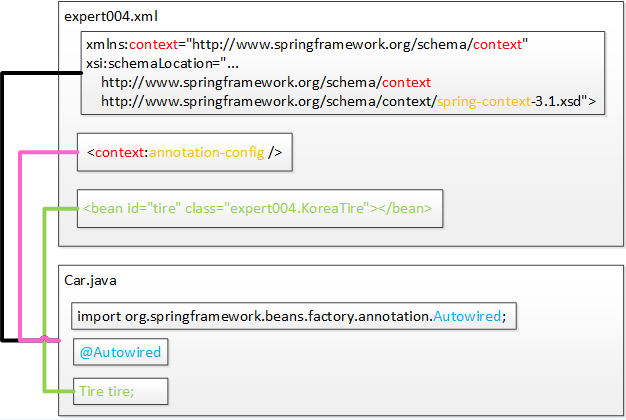
변경된 스프링 설정 파일을 보자.
<?xml version="1.0" encoding="UTF-8"?>
<beans xmlns="http://www.springframework.org/schema/beans"
	xmlns:xsi="http://www.w3.org/2001/XMLSchema-instance"
	xmlns:context="http://www.springframework.org/schema/context" <!-- 이부분 추가 -->
	xsi:schemaLocation="http://www.springframework.org/schema/beans http://www.springframework.org/schema/beans/spring-beans.xsd
	http://www.springframework.org/schema/context http://www.springframework.org/schema/context/spring-context-3.1.xsd"> <!-- 이부분 추가 -->

	<context:annotation-config/>

	<bean id = "tire" class="expert004.KoreaTire"></bean>

	<bean id = "americaTire" class="expert004.AmericaTire"></bean>

	<bean id = "car" class="expert004.Car"></bean>

</beans>
@Autowired의 의미를 이해해 보자. 이것은 스프링 설정 파일을 보고 자동으로 속성의 설정자 메서드에 해당하는 역할을 해주겠다는 의미다. 그리고 XML파일에서 속성<property>태그가 사라진 것을 볼 수 있다. 왜 사라졌을까? @Autowired를 통해 car의 property를 자동으로 엮어줄 수 있으므로 (자동 의존성 주입) 생략이 가능해진 것이다.
그럼 변경된 Car 클래스의 코드를 보자.
import org.springframework.beans.factory.annotation.Autowired;

public class Car {
	@Autowired
	Tire tire;

	public String getTireBrand() {
		return "장착된 타이어 : "+tire.getBrand();
	}
}
번외 1. AmericaTire로 변경된 Driver.java를 실행하려면 어디를 고쳐야 할까?
A. 재컴파일할 필요없이 expert.xml에서 bean id속성만 변경해주면 된다.
<?xml version="1.0" encoding="UTF-8"?>
<beans xmlns="http://www.springframework.org/schema/beans"
	xmlns:xsi="http://www.w3.org/2001/XMLSchema-instance"
	xmlns:context="http://www.springframework.org/schema/context"
	xsi:schemaLocation="http://www.springframework.org/schema/beans http://www.springframework.org/schema/beans/spring-beans.xsd
		http://www.springframework.org/schema/context http://www.springframework.org/schema/context/spring-context-3.1.xsd">

	<context:annotation-config/>

	<bean id = "tire02" class="expert004.KoreaTire"></bean> <!-- id를 tire02로 변경 -->

	<bean id = "tire" class="expert004.AmericaTire"></bean> <!-- id를 tire로 변경 -->

	<bean id = "car" class="expert004.Car"></bean>

</beans>
번외 2. 위 번외 1에서 KoreaTire부분을 완전히 삭제하고 AmericaTire 의 id 속성을 삭제해보자.
<?xml version="1.0" encoding="UTF-8"?>
<beans xmlns="http://www.springframework.org/schema/beans"
	xmlns:xsi="http://www.w3.org/2001/XMLSchema-instance"
	xmlns:context="http://www.springframework.org/schema/context"
	xsi:schemaLocation="http://www.springframework.org/schema/beans http://www.springframework.org/schema/beans/spring-beans.xsd
		http://www.springframework.org/schema/context http://www.springframework.org/schema/context/spring-context-3.1.xsd">

	<context:annotation-config/>

	<bean class="expert004.AmericaTire"></bean>

	<bean id = "car" class="expert004.Car"></bean>

</beans>
Driver.java를 실행하면 정상적으로 구동되는 것을 확인할 수 있다. @Autowired 가 지정된 tire 속성과 XML파일에서 id 속성이 일치하는 것 같았다. 번외 2에서는 bean의 id를 삭제시켰는데 어떻게 정상적으로 구동이 되는 것일까?
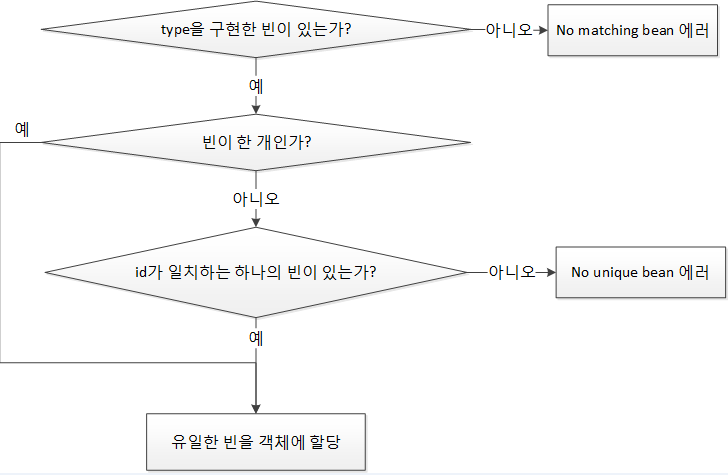
바로 인터페이스의 구현 여부때문이다. 스프링의 @Autowired 는 type 기준 매칭에 있다. 같은 타입을 구현한 클래스가 여러 개 있다면 그때 bean 태그의 id로 구분해서 매칭하게 된다. 만약 위의 번외2의 경우가 아닌 bean이 하나가 아닌 여러개였다면 에러가 날 것이다.
여기서 기억해두면 좋은 것이 하나 더 있다. 바로 id와 type의 우선순위이다. 스프링은 id와 type에 우선순위가 있으며 id보다 type을 먼저 찾는다.
'Spring' 카테고리의 다른 글
| [Spring] AOP 에 대해서 (2) (0) | 2021.10.04 |
|---|---|
| [Spring] IoC/DI 제어의 역전/의존성 주입 (3) (0) | 2021.10.03 |
| [Spring] IoC/DI 제어의 역전/의존성 주입 (1) (0) | 2021.10.02 |
| [Spring] 스프링이 사랑한 디자인 패턴 (2) (0) | 2021.10.01 |
| [Spring] 스프링이 사랑한 디자인 패턴 (1) (0) | 2021.09.30 |


댓글